
How to Unprotect a Protected Sheet in Excel
May 17, 2021
Protection is always a good thing. Nowadays, most people take protection seriously. Protection from getting sick (I'm looking at you, COVID), protection from fraud, from... overwriting your Microsoft Excel file? Yes, that's right! No mask, hand sanitizer, nor vaccine in the world will protect your Excel workbook structure from the annoying fingers of your co-workers. Nearly all of our Excel files are protected to some degree. While ours are protected to improve usability and reduce user errors, a password-protected worksheet is used for different reasons. Perhaps your spreadsheet is a private document and requires a specific clearance. You can password-protect your Excel file or even Google Sheets so that it will prohibit viewing and editing for those who don't have credentials. TLDR; yes, a protected worksheet has existed for quite some time. This article will discuss how we can create a password-protected sheet, secure our Excel sheet, and unprotect an Excel sheet manually with or without a password. Don't fret because the methods used in the article will be super simple. No need to open that Visual Basic Editor or remember your VBA code course. Let's start on how to protect and unprotect our Excel Sheet! 
Protecting Your Sheets! (The Easy Way)
Did you know we have a video on how to lock cells and create a protected Excel worksheet? Find that video here to learn how to implement worksheet password protection. Excel allows you to turn your sheets into a protected or protected worksheet. The difference between the two is that if you watch just the sheet, the protection is just for the sheet or sheets, and you turn the safety on. The protection applies to the whole file, including hidden sheets for a protected workbook. Let's see how we can do that. In your Excel workbook, if you select all cells, right-click, and open the Excel Format Cells pop-up dialog box, we can see that all cells are set to lock by default in the Protection Tab. 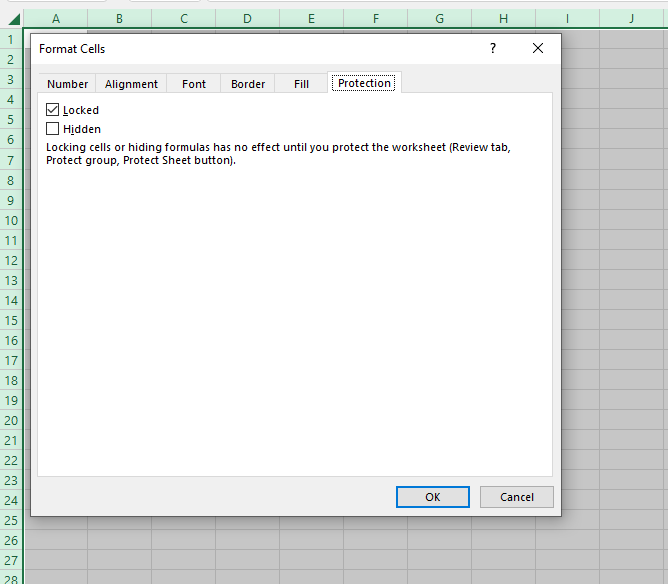 When we turn on sheet or workbook protection, your Excel workbook will default lock down all the cells in the entire file. If you want to leave some cells unprotected, you can do that by unticking the Locked checkbox for the ones you want to leave open. Now to turn on protection. Let's head over to the Review Tab.
  The Protect Sheet and Protect Workbook buttons are in the Protect Group of the Review tab. Pressing the Protect Sheet button opens a dialog box asking for the password if you want to password-protect your sheet. It automatically ticks the "Protect Worksheet and contents of all locked cells" option, and below, we have different permissions you can grant to other users of the file.
 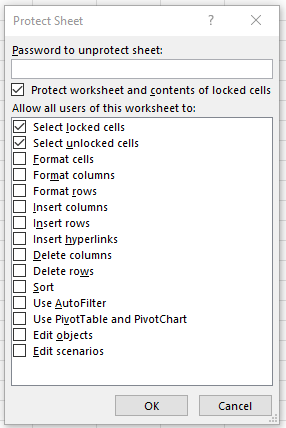 If we click the Protect Workbook button, it simply asks for our password and if we want to protect the workbook structure or Windows. In a few easy steps, you now have a password-protected Excel document! Now let's see how we can unprotect Excel spreadsheets when we have that senior moment and find ourselves with a lost password.
A Protected Spreadsheet is a Double-Edged Sword
For the rebellious teenager, too much protection can be harmful; in some cases, it can also be the case for your Excel Sheets. Like the Dark Knight that protects Gotham City, our password-protected Excel worksheet can live long enough to be the villain if we forget how to unlock said password-protected Excel file. In this part of the article, we'll discuss unprotecting an Excel sheet.
Even Your Protection Needs Protecting
Password protection is essential for your Excel Worksheet. Microsoft Excel allows you to create protected workbooks that are fine without passwords. But depending on your Excel Worksheet's journey, saving your sheets without a password gives you as much protection as some weird essential oil remedy. Passwords are the literal digital keys to almost everything on your computer. Wouldn't you leave your car keys hanging on your windshield wipers? The same goes for passwords. Ideally, you'd want to keep your password in a secure place like your brain. Unfortunately, we live in a less-than-ideal world, so we know it's only a matter of time until your password is replaced by the next meme you see on the internet, so make sure that your password is stored in a secure place safe from prying eyes. When thinking of a password, make sure you put a usable password in place, as it helps you remember better to avoid locking yourself out of your password-protected worksheet. In a way, you can say that such a thing as a protected password exists. Excel does not store passwords where you or Microsoft can search for them. Without a password, hackers will see your sheet is as secure as Knox's. This also applies to other Office programs that allow you to protect files, so it's always a good idea to store your passwords in a safe place. Some other companies offer software to unlock files or give a cracked password. For legal reasons, we cannot recommend these programs.
Unprotect An Excel Sheet (The Easy Way)
Without a password, an Excel Workbook is pretty easy to unprotect. You must return to your Review Tab and select either Unprotect Sheet or Protect Workbook in the Protection Group. 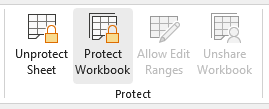 If you put password protection, it will ask for the password in the pop-up dialog box.
 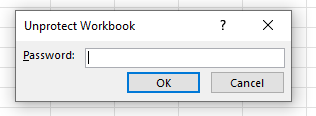 And there you have it! If you know the password, then you're all set!
Unprotect An Excel Sheet (The Hard Way)
This tutorial will walk you through accessing a protected Excel sheet with a lost password. In the example protected sheet, if you try to modify any cell outside the B2: D6 range, you will receive the following error message: 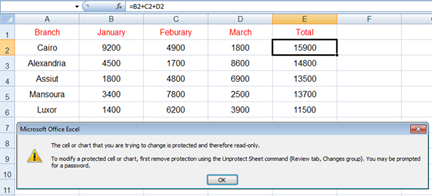 The unlocking part of a worksheet without a password might be a tad bit difficult. We will show you a trick to get around that in case you lost yours that will make you feel like you're the Hackerman himself. There is a known VBA code that you can plug in the VBA Code in your Visual Basic Editor and call it a day to unlock your password-protected sheet. This method won't be too hard. No VBA code is required! Just a vast reminder to only unlock your own Excel document! Trying to open an Excel spreadsheet that isn't yours could get you in serious trouble. More so a password-protected spreadsheet. By default, the operating system hides the file extension. That's the assortment of letters usually prefixed with a period. We must show the Excel spreadsheets extension, xlsx, and open the Control Panel. Note: The steps to unlock a password-protected Excel spreadsheet may differ slightly depending on your OS version; in this example, we're using Windows 7.
 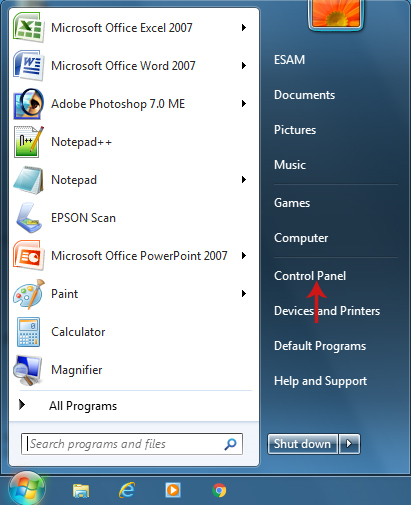 Click on Folder Options.
 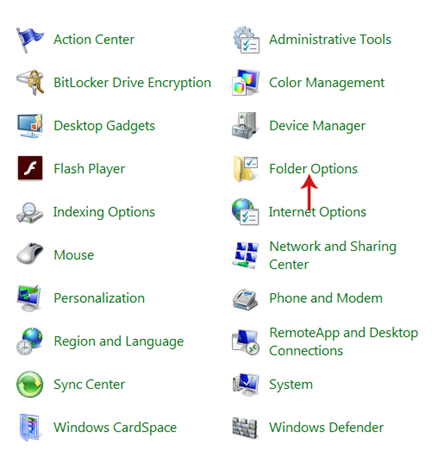 A pop-up dialog box will appear. Open the View tab and remove the checkmark next to the selection of Hide Extensions For Known File Types. Then, press the OK button.
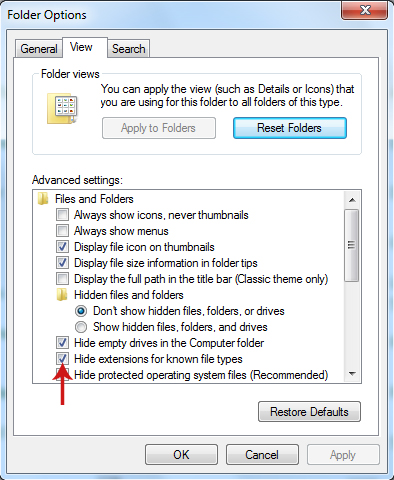
 Go to the source where the Excel file you want to remove the protection from is located, and you will notice that the xlsx file appears next to the file name.
  Change the file extension from an xlsx file to a zip file, converting it to a zip file. To do so, right-click the file and choose Rename from the shortcut menu.
 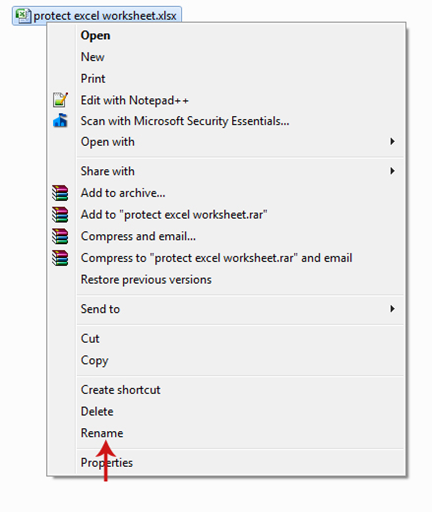 Don't change the filename; change the extension by scanning xlsx, typing zip, and then hitting the Enter key. A confirmation message will appear. Press the Yes button.
 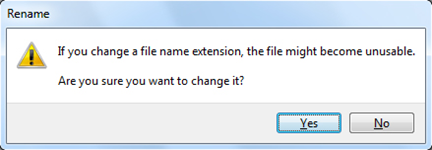 Now the file will change shape to become as follows.
  Double-click on the file. Your existing decompressor program, like WinRAR, will open the file because it is now a zip file after changing the extension. Open the Xl folder:
 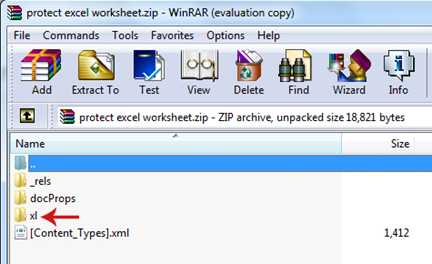 Then the worksheets folder.
 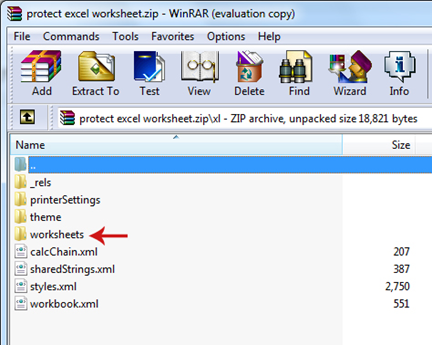 All worksheets in the file will appear. Drag the worksheet you want to protect, drop it next to the Excel file, and do not close the WinRAR program.
 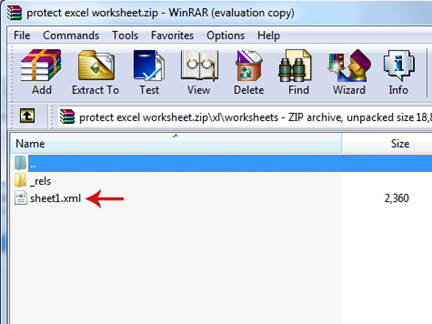 You will get the following result.
  Note that the sheet1 file has an XML file extension, which means that this file contains code written in XML. We will open this file and modify it to remove the protection of the worksheet. Right-click on the sheet1 Excel file, then go to Open with, and from the submenu, choose Notepad.
 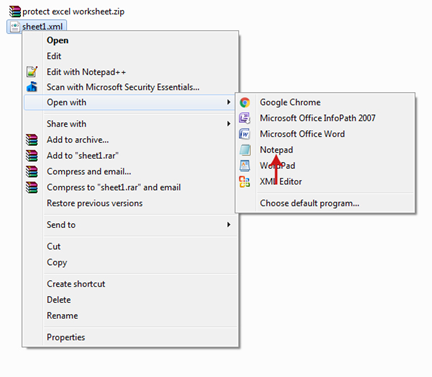 The file will be opened, and you can see your Excel workbook.. just written in code. The code written in XML will appear as a set of tags that start with the> title and end with the <. Search for the tag that begins with the word sheet "protection," select the title entirely, and press the Delete key on your keyboard to remove this tag from the code, as shown below.
 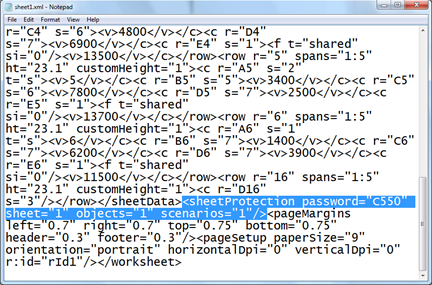 Save the changes by opening the File menu and clicking Save, then closing the file.
 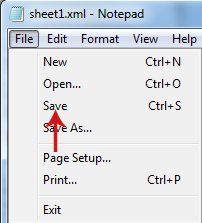 We will return the sheet1 file after modifying it to its original location within the WinRAR program. Drag the file and drop it into the WinRAR program to do so. The following box will appear. Press the OK button.
 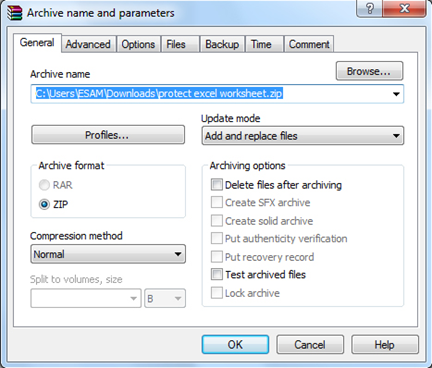 Close WinRAR and delete the sheet1 file next to the Excel file, as we don't need it now. Return the file extension to an xlsx file. To do so, right-click on the file, choose Rename from the shortcut menu, delete the zip, and type xlsx.
  Now open the Excel workbook. You will notice that it is no longer protected with a password; you can modify it as you like. You can do this to recover your Excel files to save you from having to redo your hard-earned spreadsheet. What's better than sweating bullets trying to remember your spreadsheet's password? Get your templates from Simple Sheets! We have over a hundred pre-built Excel Spreadsheets. All our Excel files contain locked cells and are protected so you can leave the worrying to us.
Want to Make Excel Work for You? Try out 5 Amazing Excel Templates & 5 Unique Lessons
We hate SPAM. We will never sell your information, for any reason.

